Creating See Also Links in Word
See Also links, also known as ALinks, or associative links, are links that may be of interest to the user viewing the current topic. These links use internal identifiers to specify the links and the link list is built dynamically based on the topics available when the user clicks to display the links. See Also links are important to use with larger help sets and merged help sets.
Related topics and See Also links provide similar capabilities, but there are several important differences:
See Also links are useful if you plan to merge help systems. For example, if you have a multiple help systems that you merge into one main help system at run time and if your topics in the merged help systems contain See Also keywords that are also used in the main help system, links to those topics are included in the See Also lists in the main project.
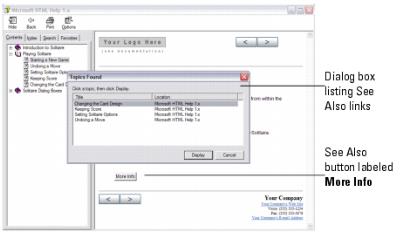
You can create See Also links as buttons or as inline text links in Microsoft HTML Help and WebWorks Help. The following example shows how the two different types of See Also links display in a Microsoft HTML Help system.
Create See Also links by applying the See Also paragraph style or character style to text in your Microsoft Word source documents and inserting markers into your Microsoft Word source documents.
Create See Also links by applying the See Also paragraph style or character style to text in your Microsoft Word source documents and inserting markers into your Microsoft Word source documents. To create See Also links, your Stationery and template must have the following items configured:
SeeAlsoLinkWindowType marker type if you generate Microsoft HTML Help and you want to display the target topics in a custom window
The following procedure provides an example of how to create See Also links in Microsoft Word source documents using Microsoft Word 2003. Steps for creating See Also links in Microsoft Word may be different in other versions of Microsoft Word.
To create a See Also link in a Microsoft Word source document
1. Identify each topic to which you want to link from a See Also link, and then complete the following steps for each topic:
a. Insert your cursor into the topic to which you want to link.
b. On the WebWorks menu, click Markers.
c. In the Marker field, select the SeeAlsoKeyword marker.
d. In the Value field, type a text string that is a unique identifier as the See Also keyword for the topic. See Also keywords are case sensitive and cannot contain punctuation or spaces.
For example, if you have a unique topic called About WebWorks Help, type AboutWebWorks help in the Value field.
e. Click OK. ePublisher inserts a SeeAlsoKeyword marker at your insertion point. This marker identifies the topic for See Also links.
2. Identify the topic where you want to insert a list of See Also links.
3. Enter the text you want to display for the See Also button or for the See Also inline text link on a separate line in the source document where you want the See Also button or inline text link to display.
For example, if you want to create a button with the text See Also on the button, type See Also. If you want to create inline text with the text Additional Information for the link, type Additional Information.
4. If you want to create a See Also button for your See Also links, apply the See Also paragraph style to the text you want to display in the See Also button.
5. If you want to create a See Also inline text link for your See Also links, apply the See Also character style to the text you want to display in the See Also inline text link.
6. Apply an OnlineOnly condition to the See Also text. Applying an OnlineOnly condition to the See Also button or See Also inline text displays the See Also link in your generated output, but does not display the See Also button or link in your printed content.
7. Insert your cursor inside the text you specified for the See Also button or See Also inline text link.
8. For each topic to which you want to link from a See Also link, complete the following steps:
a. On the WebWorks menu, click Markers.
b. In the Marker field, select the SeeAlsoLink marker.
c. In the Value field, type the text string that is a unique identifier for the topic to which you want to link. This text string is the text string you typed when you created the SeeAlsoKeyword marker for the topic.
For example, if you created a SeeAlsoKeyword marker with the text string AboutWebWorksHelp, type AboutWebWorksHelp in the Value field for the SeeAlsoLink marker.
d. Click OK. ePublisher inserts a SeeAlsoLink marker at your insertion point. This marker identifies the topics users can link to when they click the See Also button.
9. If you generate Microsoft HTML Help output and you want to display the target topics in a popup menu, complete the following steps:
a. Insert your cursor inside the text you specified for the See Also button or inline text link.
a. On the WebWorks menu, click Markers.
b. In the Marker field, select the SeeAlsoLinkDisplayType marker.
Note: This marker type is supported only in Microsoft HTML Help.
c. In the Value field, type menu. By default, Microsoft HTML Help displays See Also links in the Topics Found window. To display See Also links in a popup menu, specify menu for the marker value.
d. Click OK. ePublisher inserts a SeeAlsoDisplayType marker at your insertion point.
10. If you generate Microsoft HTML Help output and you want to display the target topics in a custom window, complete the following steps:
a. Insert your cursor inside the text you specified for the See Also button or See Also inline text link.
b. On the WebWorks menu, click Markers.
c. In the Marker field, select the SeeAlsoLinkWindowType marker.
Note: This marker type is supported only in Microsoft HTML Help.
d. In the Value field, type the name of a custom window defined for Microsoft HTML Help by the Stationery designer.
For example, if the Stationery designer defined a custom window called ContextHelp to use to when displaying context-sensitive help topics, type ContextHelp in the Value field for the SeeAlsoLinkWindowType marker.
e. Click OK. ePublisher inserts a SeeAlsoDisplayType marker at your insertion point.
11. Save your Microsoft Word source document.
12. Generate output for your project. For more information, see Generating Output.
13. In Output Explorer, go to the page where you created the See Also links and verify that ePublisher created the See Also button or See Also inline text and that the See Also button or inline text displays the links you specified. For more information, see Viewing Output in Output Explorer.
Last modified date: 12/09/2021