How To Upgrade To Reverb 2.0
Quick article on how to take an existing ePublisher project and add a target that generates Reverb 2.0 output.

Tony McDow
CEO & Founder of WebWorks
Have you ever tried to upgrade from PDF, WWH5 or Reverb 1.0 to a more advanced user-friendly output? We know it might seem difficult for a multitude of reasons. Perhaps you have inherited a project and you are not sure where to start or maybe you have several customizations in your output that make upgrading seem impossible. With the release of ePublisher 2018.1, many ePubilsher customers have quickly and easily upgraded to Reverb 2.0. By utilizing the information in this article, this post will help get you started on the path to a Reverb 2.0 HTML5 advanced document set. Here are a few reasons why it is a good idea to upgrade to Reverb 2.0
- Improved Customer Satisfaction
- Increased Product Value
- Measured Customer Engagement
Reverb 2.0 was designed to help you, the Content Creator, get the most relevant information to the customer in the least amount of time while maintaining an intuitive feel to your document sets. If you are looking to increase the value documentation brings to your organization Reverb 2.0 is a big step in that direction. Process for upgrading Find the Right Reverb 2.0 Skin
To view the Reverb 2.0 skins, we recommend adding a target to your existing ePublisher Designer project. This is so you can see what your source documents look like in the new skin and identify which customizations are going to automatically transfer over and which ones will need to be manually transferred. You always have the option of creating a new Designer project to see what the default output will look like.
How to add a target
-
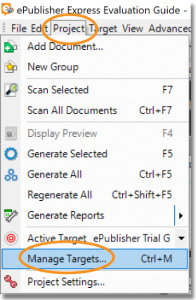
Click on the Project Tab in the menu bar and select Manage Targets
-
In the Manage Targets window, you will select Add to create a new target
-
Pick a target name and enter it in the Target Name box
-
In Format Type, click on the drop-down arrow and select WebWorks Reverb 2.0
Click OK
-
Verify that the new target name appears in the Manage Targets window.
-
Click Close
Once the new target has been added, it will now appear in your active target window. To view the new format simply select the target and generate all. Feel free to experiment with each new target, once you find the right Reverb 2.0 skin you can delete the other targets.
Choosing the Right Customizations
Once you have selected a skin the next step is to choose the right customizations. It is a simple process:
- Compare customizations from the old target
- Pick which new features to customize in Reverb 2.0
- Regenerate your output.
When comparing customizations (for more about ePublisher customizations click here) we recommend starting with the Style Designer. Any customizations in the Properties or Options tab will be automatically carried over to Reverb 2.0. Only review bolded items on the Target Properties or Target Options tab because they are not automatically carried over because they are Target specific. After you have reviewed the old customizations you can add new ones. All new features available in this area will be listed in the Properties and Options tab. If you see a feature you would like to customize only for the selected target, look for the feature listed in the Target Properties or Target Options and make the changes. Once you're finished working in the Style Designer compare customization in the Target Settings window. Hint: create an excel sheet with the categories in Target Settings that have been customized. If a category carries over to Reverb 2.0, the name will be the same in the Target Settings window. For example, Company Information is the same category name in the Target Settings of WebWorks Help, Reverb 1.0 and Reverb 2.0.With the excel spreadsheet created you can compare target settings in Reverb 2.0 and determine which settings should be transferred. After transferring the target settings you can scroll through the categories and determine which new features to customize. After all the customizations have been made, generate the new target. If the output meets all the requirements, we would recommend moving to the section “Putting on the Final Touches” If not, you will need to compare the Advanced tab customizations. We recommended you have the person who created the Advanced tab customizations compare them. If that person is not available, you can create a support ticket to get help with the transfer. If you would like to learn more about the Advanced tab customizations there are several options available to you. We have ePublisher 201 training that covers Advance tab customization in detail. We also have Study Hall in which you could bring in a project and have someone help you determine the best way to customize a project. The optimal path is to take ePublisher 201 training for a solid overall understanding of the Advanced tab features and then Study Hall or a support ticket for one-offs.
Putting on the final touches
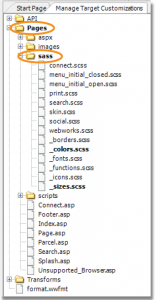
The final step of the process is to put on the final touches to your Reverb 2.0 output. Reverb 2.0 was developed with Sass technology to make it easier to customize colors, logo placement, and icons. To change the color, logo placement or icon of your Reverb 2.0 output, navigate to the proper file under the Advanced tab. Once you have selected either target or format customizations navigate to the Sass folder and make the necessary customizations in the correct file.
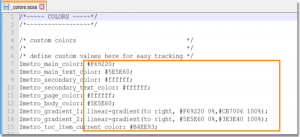
_colors.scss is the file to change the color scheme of your Reverb 2.0 output. This file is written so you can design a nice output with as few as three colors. You just enter the hex color code in the proper location as indicated in the picture below.
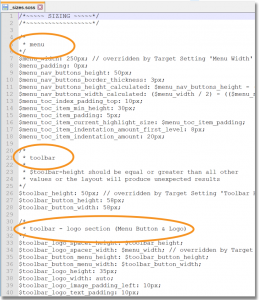
The _sizes.scss file is where you can control the dimensions of sections within the Reverb 2.0 layout. Sections include areas like menu, toolbar, and toolbar logo. The file is well noted and easy to navigate. Just find the right section and make the necessary changes.
These are just a few examples of the Sass system we are using to help you customize Reverb 2.0. For a full list of the Sass files and their descriptions, you can go to our online documentation.
We at WebWorks have designed our newest output with your customers in mind. Reverb 2.0 has new and improved features to help you guide your customers to the information they need. We've made upgrading easy for you by decreasing the amount of time needed to do so and by helping make sure you hold on to the customizations you've added. When making the move to Reverb 2.0 feel free to reach out if you have any questions please feel free to contact our support at https://usa460.sfdc-lywfpd.salesforce.com/sserv/login.jsp?orgId=00D500000007FPs